 Setting the Foundation
This first entry relates to establishing a physical foundation: how we set initial contact of any part of the body with the ground. Usually that means hands and feet. How you place these will determine the quality of your foundation and lay the basis for optimal alignment. As a yoga teacher, I find that most people are unaware of how they stand or where their body is within space. Sometimes showing up to yoga class is an opportunity to “check out”, follow the music or the people around: the body may be present but the mind is somewhere else. To get the most out of your yoga practice, the mind needs to pay attention and become aware of what your body is doing, how it's doing it, and the effect that is having in your body. Sometimes this form of inattention simply means that we need to slow down. Practicing good alignment also sets a powerful and clear intention for your yoga practice: to be present and pay attention to detail. This approach to your hatha yoga practice not only will strengthen your body but also sharpen your mind. In this way, your practice become meditation in action. Step #1: Align Your Feet In any standing posture, how you place your feet is the most basic way you can create a strong and steady posture. How to Align the Feet: Place your feet hip distance apart. Weight should be equally balanced through the four corners of the feet:
Feet Parallel: To make the feet parallel, first trace two imaginary lines running from the center of the front of the ankles to the middle of the second toes. Then adjust the feet so that as you look down on them, these two lines are parallel. Learn and practice this basic alignment to strengthen your and allow you get more from your yoga practice. Author & Art by Kanta Barrios
2 Comments
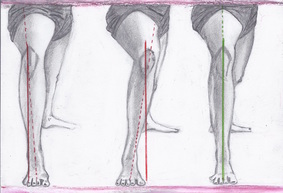 Aligning and protecting the knee joints:
Knees are a hinge joint designed to bend and extend. Any other action such as overextending or side to side movement of the joint will hurt the knee. If you want to protect your knees, heal or prevent injury, pay close attention to how you align your knee with the rest of your body, especially the feet, and how you maintain that alignment while you are moving into, out of and holding the asana. Feet parallel and knees When you align your feet so that they are parallel, whether hip distance apart or wide apart, the knee caps should always be pointing straight ahead in line with your toes.This is true whenever the legs are straight or bent. Knees in asymmetrical poses Often in yoga asanas, one foot will be pointing straight ahead while the back foot is in at a 45 degree angle or parallel to the back of the mat. Warrior pose, Triangle pose, side angle pose, etc. The principle still applies: your knee caps should be in a straight line with your toes. Especially when you bend the knee. Actions that protect the knee joints It is important to engage and strengthen the leg muscles so that each muscle is strong enough to create space and freedom in the joint. Most knee misalignments result from not engaging the muscles enough to keep the joint stable. While we often hear the instruction in a yoga class to "engage, tone and lift the leg muscles," how to engage the muscles is often left out. If we want to lift the muscle, first, it has to evenly engage in all four sides of the leg and that action be initiates from the foundation, the feet. Ground the four corners of the feet, bend your knees slightly, knee caps pointing straight ahead, and lift and spread your toes. When you first attempt these actions, your inner arch will tend to collapse while you try to lift your pinky toe, so be patient. It will take some practice to ground the four corners of the feet ~especially the ball of the big toe~ while lifting the pinky toe, while lifting the inner arches and keeping your knees caps straight all at the same time!!! Yes, it can be done! It just takes practice. This actions will help you feel like you are actually engaging the muscles evenly on all four sides of your legs, calves, hamstrings and quads. Feel how the muscle wraps around the bone and lift from the feet all the way up to the pelvis. You will feel strong and steady - and best of all, this alignment will help protect your knee joints. 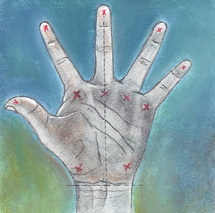 Common complain in yoga is pain in wrists and tight shoulders while holding weight bearing poses on the hands. Learn to distribute the weight evenly on the hands while helping u build strength in the arms to free your shoulders.
Here are a few ways to help you place and align your hands during yoga poses. The way you place your hands and activate key muscles in in Yoga will help you prevent and stress to the wrist joints. Determine the ideal distance between your hands Finding the ideal distance between hands will make you feel steady and give a sense of freedom and space in the chest, shoulders and neck. If your hands are too close together your shoulders will narrow and back muscles tighten To help you find the ideal distance for you, place your hands on your mat, spread your fingers wide, with your middle finger pointing straight ahead so that the creases of your wrist are parallel to front of your mat. Then draw two imaginary lines from the middle finger to the outer shoulder. In other words, if your hands are to close your outer shoulder will be broader, and if your hands are too wide our outer shoulders will narrow in a V line. Avoid pain and Stress in the wrist joints One of the main complains when practicing yoga is pain in the wrists while holding poses such as downward facing dog, hands stand or any other arm balances. Good news is that it only takes a bit of technique and strength in the fingers and arms to avoid collapsing all your body weight on your wrists. These are some key actions and tips to practice -Extend the fingers out wide and away from the center of your wrists -Press your finger pads down firmly at all times, feel like you are clawing and gripping the the ground with all ten finger pads. Practice this, and you will feel the back of your arm muscles firm. This action alone will help engage and tone the your forearms and triceps muscles. -Press the base finger, metacarpal knuckles firmly on the ground. Specially the index finger knuckle. Make it a point in your practice of never leaving a gap between the mat and the index finger base knuckle. - Keep all finger pads and metacarpal knuckles active while you place the bottom two corners of the hands down. -Draw energy from the fingertips up through the wrists and arms - you should feel your arm muscles tone and lift up towards the shoulders. Practice on all fours, and then lift your knees and hips up to Downward facing dog. Hold the pose as long as you are able to hold finger pads, and knuckles down. Your fingers and arm muscles will strengthen and help you create space at the wrist joint. What this means is: No more wrist pain! Try it and let me know how it goes! Kanta Barrios |